JBCL About Time Professional - Time Recording
New Release as standalone Time Recording program


JBCL Small Change Meter - get top quality commercial software free -
costs only a tiny amount to use

Main Points:
- Professional Time Recording Software - called About Time Professional
- This software is freely available to download and use - it is not copy
protected
- You can get updates at any time freely to the latest version and get
new features at no extra cost
- You can freely move software and data to another computer.
- You can freely copy the software to new computers for new users
- You pay very small charges to use the software - typical charges are 1
cent for recording a timesheet entry etc. Typical monthly totals
may be around $3-$4 per month used constantly - the less it is used the
less it costs. Pay only what you use.
- The software starts with a credit balance, so you do not have to
pay anything until you have used up the credit and tried it out
- Usage charges are accumulated by another JBCL program : JBCL Small
Change Meter. You will see this program start automatically,
just leave it running in the background. You can use its
screen to check your running balance etc.
- Program contains full ability to Maintain and add New
Clients/Jobs/Work Descriptions etc
- Multiple Employees can use the same setup and each can store their
time separately
- Also contains a TimeSheet Manager program which allows an accounts
department to review and report on time for the employees.
- Multi Employee, Multi Company
- Future plans are to add full invoicing (on top of reports already
there), mobile versions and many other features.
Help Topics are:
Quotes about Time
To Index
JBCL About Time Professional - Time Recording
Advantages:
- This is much simpler and more flexible that using a paper timesheet
- If you use the computer to record the time it is much more accurate
and you do not have to watch the clock
- Those who use an accurate online recording system have been found to
gain around 30% more charged time.
- A full history of time recorded is permanently kept and can be
searched at any time.
- Time recorded can be posted simply to BCL time recording systems
As with inquiry jobs or matters can be found either by code or by name or
description.
Time Recording System for everyone
who does not have one
The program can be run completely standalone, and provides full Client
and Jobs lists that you can easily set up, ideal for anyone who does not
have access to a time recording system.
This system is flexible: you can set it up to force users to confirm all
details (chargeable time, and Cost Centres and Work Descriptions) as
they go, or these can be optionally be added later. This means that
users can record time the way they prefer to.
The system can be used in two main ways:
1 - Time is logged as you go from one task to another. This is the
ideal way as by the end of the day there should be nothing more to do as all
the time recording information is complete, and it can then be posted.
2 - Time is entered on the screen similar to a time sheet. This is
useful when you are away from a screen or at a meeting and the time needs to
be entered after the event. There are 3 different ways to enter time
after the event.
These methods can be used interchangeably, and even at the same time.
Information available from Time Recording
Various reports are available on recorded data:
One report writes information much like a standard time sheet, and can be
used for manual input into any time recording system. Depending on how the
system is set up, the details of Cost Centres, units logged and chargeable
are already present. The amount of information in the reports can be
selected: the report can be detailed, or show summary totals, or just daily
totals for each employee.
A listing of time spent for any client is also available, which is useful
for preparing invoices and answering queries.
The stored information may also be posted automatically to Contacs or to BCL
Time and Cost.
To Index
Altering Setups
How to Change Company or Ledger Setups
Click the button "Setup" to set up the system options.
The settings are in two sections - those for everyone (All screens)
Here are the typical setups for running the Standalone version of About Time
(BCL users would choose which BCL system the online time recording
integrates - either your Contacs company number or the BCL Accountants Time
and Cost number.)

And For This Screen
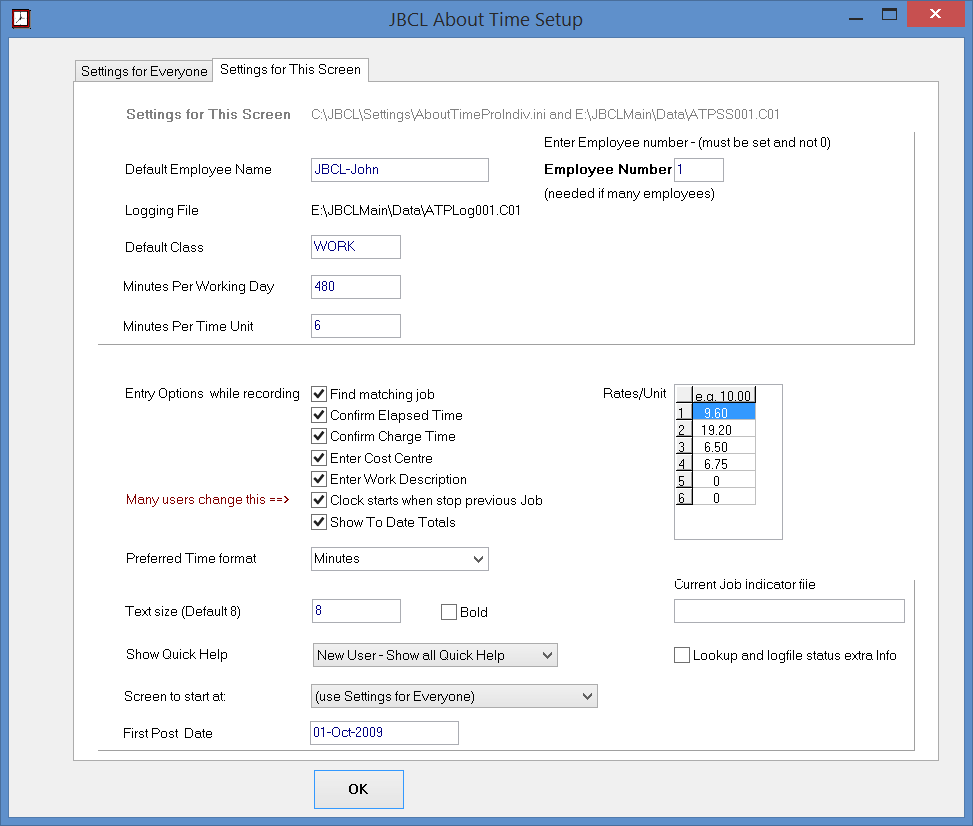
These options give fine control on how time is recorded as you go.
Note:
-The defaults are all options turned on. This makes you record all
details for each job as you go. Operating like this is very fast so
try this first. If you find you prefer to not record everything
as you go you can change this later.
-"Clock Starts when stop previous job". By default the system is
always recording time for something. When you click the "Stop"
button for a job, that time is used as the start time for the next
job. If you prefer the next job time to not start until you click
"OK" on it, then uncheck this option. You can always alter the start
time for any job with the edit time buttons as well. - so the system has
complete flexibility.
Click OK when finished and say Yes to save if you wish to save changes.
Note - make sure the employee rates per unit are loaded. These may
not get automatically picked up from the BCL systems.
To Index
How to Use
Online Time Recording records the Job or Matter, the time started, the
elapsed time and the chargeable time, Notes, and a Cost Centre and Work
Description.
There are 3 main ways to enter time, and you can use them all
interchangeably.
- Clock - when you click Start and Stop the computer minds the time
taken for you. This is the most accurate option, and the ideal if
you are recording time as you go.
- Standard Timesheet Edit - you see a list of time entries spanning
several days, looking like a paper timesheet, and can double click an
entry to edit details. You can also insert new
records. This is ideal when reviewing Timesheet entries.
- Diary Entry - where one day at a time is shown graphically and you can
use the mouse or keyboard to select a range of time or double click an
entry to edit the details. This option is ideal for entering
time after the event, eg if you were away from your screen.
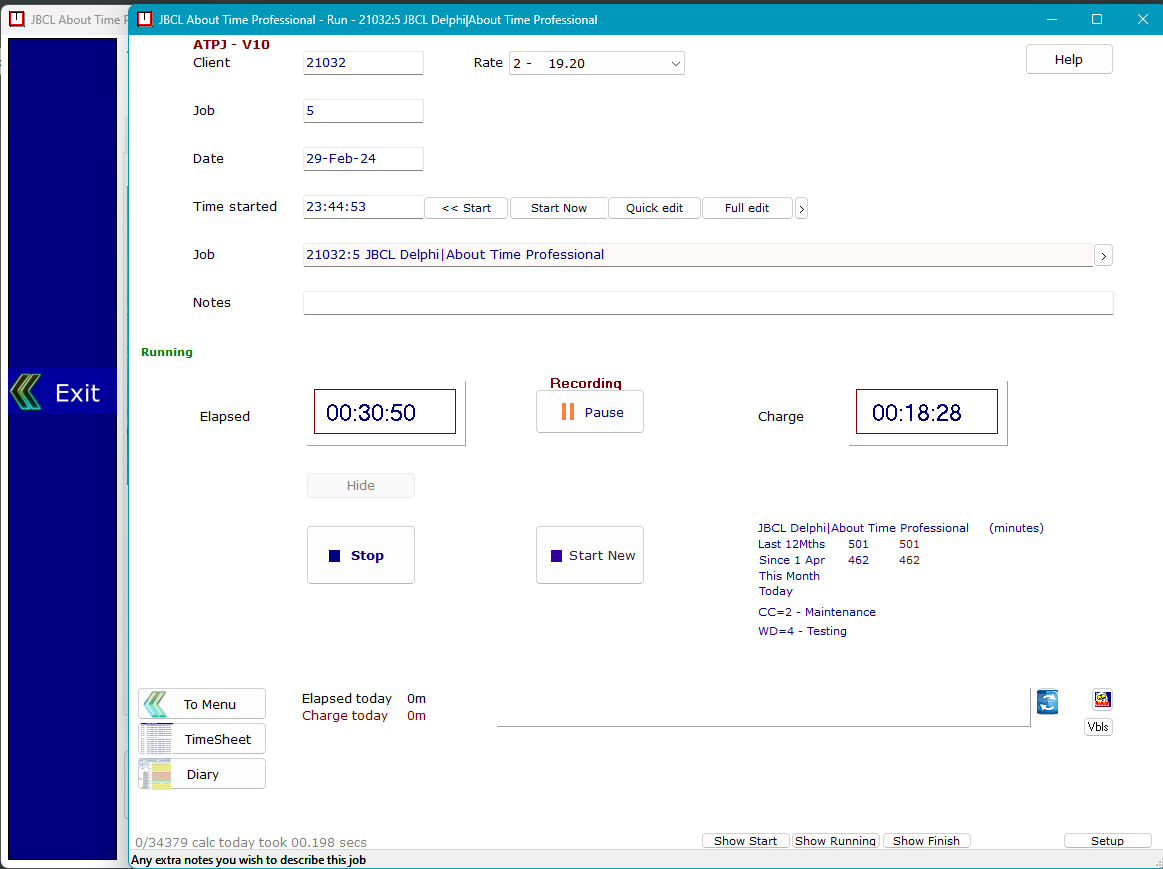
Here are some screen shots showing how to log time using the Clock:
Note the fields from Time Started upwards are filled in automatically, and
you do not normally need to change them. You just specify which job
you want to record time for.
1 - Choose the job or Matter to log time for. You can enter the name
or code. If you type a name you get list to select from

Select the job or matter you want, and type in any notes you want to record
against this job, then click OK (or press Enter to get to the OK button).

Click OK -The job is now running.
Note the time either started at when the previous job was stopped (unless
you have chosen the Setup option for time to not start until you click OK).
This means there is no hurry to get the client name selected or to
type in notes. This is convenient for phone calls etc where you may
not know who the caller is at first, or who is to be charged for this time.
It also gives you time to collect notes etc before having to deal
with the time details.
If for this job you want the clock to have not started at the end of the
previous job, you can click the "Start Now" button and the start time
gets set to when you click the button.
This system is designed for a minimum of key strokes and to be used
one-handed while on the phone (as that is the way I have usually been using
it for some 18 years).

The Hide button is so you can easily Hide the time window once the clock has
started. Normally once you have started a job, the next thing is to
want the time window to be hidden, and use the screen for other work.
Finishing a job
If the time recording is hidden, look for the red clock on the task bar and
click on it to bring the About Time window back.
To finish charging for a job, click the Stop Button. The time stops at
the moment you click Stop.

Here you can confirm the elapsed and chargeable time (in minutes), and the
Cost Centre and Work Descriptions.
You can press Enter to just move through each of these fields, and when you
press Enter on the OK button, the time is saved, and the next job is ready
to start.
Fill in the Cost Centre and Work Description details (for these you can also
enter name or code - eg Tel for Telephone will show a list of matches).
These codes are got straight from the Time and Cost system.
You are now ready to start another job.
Note - When entering time
using the clock like this, the default operation is that the next jobs start
time is the moment the previous one finished, that is every moment is to be
allocated to some job.
When you select the next job, and click OK, you will see the clock has
already been running since you stopped the previous one..
You can alter the start time - see "Altering start times" below
This means that you will also need some non-chargeble jobs, such as
administration for time not allocated to clients.
Special Jobs
There are some special jobs, if you enter in the name of a Job/Matter as one
of
Out Stop Lunch Tea
Home
then this job is treated specially - time will not be charged, and while the
time for lunch etc is recorded, it is not added to the working day total.
Also you are not required to enter any of the cost centre or work
descriptions for these.
Altering Start Times
You can override the start time - there are setup options about this, and
there are buttons wo allow you to control the start time for a job, or you
can enter the time that the job is to run from into the time box.,
- You can enter time as for example 2:16pm 14:16
14:16:00 or 2:16 (This will default to pm)
- If you click the Start Now button, the job will be set to start from
that moment.
- If you drop down the Quick Edit button you can choose from some simple
options such as "Last job ran to". This is useful if the previous
job had its time altered, and you want this one to start when the
previous one finished.
- Full time edit allows you to move both the start time of this job and
the finish time of the previous job.
Resuming a previous job
This is easy! in the Job/Matter field press the Up
Arrow . This will show a list of previous jobs and times,
and you can pick the previous one you wish..
If you enter Smith then press Up Arrow, then it will look for previous jobs
containing the word "Smith".
This feature is designed to make it easy to accurately record time while one
the phone with only one hand free and with minimum key strokes.
How to handle interruptions:
if you have a phone call or someone talk to you while in the middle of a
job, there are two ways to handle this.
1 - Stop this job and start another relating to the interruption. If
it is a chargeable interruption this is the best. The previous job can
be easily resumed afterwards.
This is described above in "Finishing a job" and "Resuming a previous job".
Note when you click "Stop" to stop a job that the clock records this moment
you click stop as the time to start the next job, so you don't need to enter
the details for it immediiately.
If for instance its a phone call, you are often quite busy at the start of a
call, and it may take a minute to work out which client needs to be charged,
and the notes to add, and you can add these when you have a moment while
still on the phone or afterwards.
As long as you have clicked Stop on the previous job, then the clock is
accurately recording time for this one.
2 - If it is just an interruption that does not need to be recorded, then
just click the pause button, and you will see:

One of the great features of the JBCL system is it records both elapsed and
chargeable time. When the interruption finishes, click Restart and you
will see now both clocks are running, but at different intervals. This
is useful as when a client suggests a bill might be reduced you can look up
to see how much time was elapsed and not charged - i.e. how much time has
already been written off.
Also often work is done for a client but not charged - this allows you to
track this also.

Resuming a previous job - more details
Especially if you have interruptions, you often wish to start the clock
again for a previous job. The system caters for this by allowing you
to pick the list of previous jobs. All you have to do is press the Up
Arrow in the Job/Matter field and a list of previous jobs is shown:
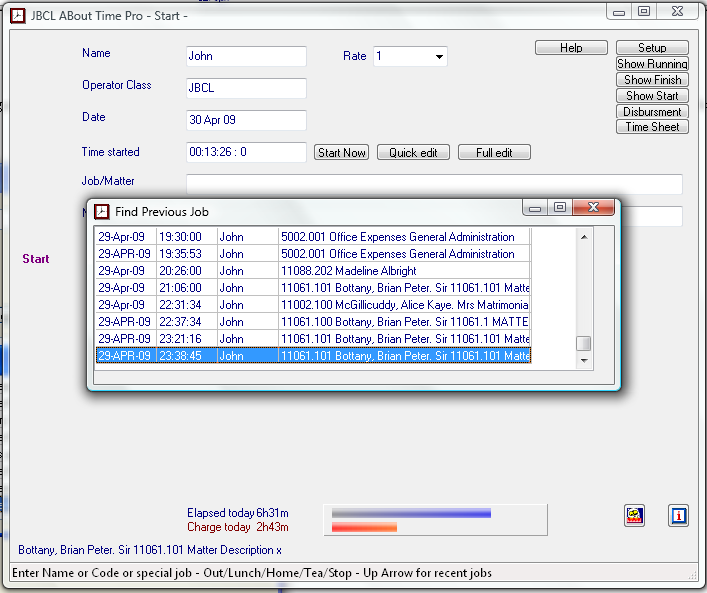
You can also filter this list - if you type "Adm" and press the Up Arrow you
will only see previous jobs with names containing the letters "adm" such as
Administration etc.
There are a lot of behind the scenes smart features - for instance the entry
of cost centres and work descriptions is usually easy as the system looks
for the values last used for this same matter or job and uses these as the
default. This means you usually don't have to enter anything in these
- it is already done.
To Index
To Index
Tips
Basic Tips and Points - especially for new users
- You can find a job/matter
by entering the code or part of the name.
- You can also restart a
previous job/matter by pressing the up arrow key to see a list of last
jobs used
- You can find Cost Centres
and Work Descriptions also by entering the code or part of the name
- The system will try to
assign the same Cost Centre and Work Description as the last time this
job or matter was used
- Special Jobs are :
Lunch, Out, Tea, Stop, Home (Time will be recorded but
not counted as part of the working day).
- The system keeps both
elapsed and chargeable time. Chargeable time is the important
one - as this is what gets posted.
- A job or matter with
elapsed time greater than zero and chargeable time that is zero
will not be posted to Trust
- All time is entered,
saved, edited and stored as minutes (not as units)
- Chargeable time is rounded
up to whole units when posted.
- Either Click or press the
Enter Key to go through the fields to start or finish a job.
- Press Pause and Restart to
handle interruptions - this stops and restarts the chargeable time
- Click "Stop" to stop a job
and check the elapsed time, chargeable time, Cost Centre, Work
description and save
- Click "Start New" to
save the existing job and quickly start a new one (you can complete
details later)
- You can set the clock to
start either when the previous job finishes, or not until you click OK
on the new job. This set in the "Setup" screen and "Settings for
this screen"
- To see time click the
"Timesheet" button, and use either Standard or Diary options
- Posting time at present
has to be done from the Standard Timesheet screen.
Recording time as you go
- Time can be easily recorded as you go.
- It is easy to check and correct each entry as you finish it and start
another.
- It is easy to quickly start recording time for another Matter with one
keystroke.
- It is easy to pause recording for the current Job or Matter when an
interruption occurs.
- There are many options to fine tune how this works - for instance many
users prefer to turn off the option "Clock Starts when stop
previous Job" (When this setting is on the system will be
wanting to record time against a matter or job the whole time the
program is running - this is more brutal than many people want.
When turned off, the clock starts and stops when you tell it to - this
does mean you may have gaps in the day where no time is
recorded). This option is in the setup screen under "setups
for this screen", and is on by default.
- Speed
Tip - In most
cases you can press TAB or Enter to go to the next field for
speedy entry (eg recording time as you go, and editing TimeSheet
Entries). That is you can use either the Enter key or the mouse
to go from field to field, whichever is easier.
- Speed
Tip - In most cases you can press SHIFT+TAB to go to the
previous field
Recording time after the event
The easiest way to add time after the event is using the diary page, where
you can drag the mouse over a range of time, eg 10am to 11am, which
automatically sets the time range to 60 minutes and then prompts you
for the job or matter code. You can also double click any
existing entry to edit its details.
You can also use the Simple or Standard Timesheet view to get a simple
listing of time and edit time this way too. This view also allows you
to view times over several days at once, and also where timesheet entries
start too close together to be easily seen in the Diary page. (This
can happen if for instance you start two jobs or matters within a minute or
within one unit, in which case you cannot easily see both in the diary
view).
You can easily switch from the Standard to the Diary view using the
convenient coloured button on each screen.
Recording time against jobs or
matters not yet in the system
The program does allow this, you can enter a temporary description for a job
or matter and use it as normal, but you will have to put in the correct
client matter code or job code before the time can be posted.
Setup Options
For a new user the main thing is make sure an employee number is entered on
the setup screen, and uncheck the option
"Clock Starts when stop previous Job" if you
prefer. Once the correct employee code is in the system it will
pick up the charging rates set up for that employee
To Index
Advanced
There are many advanced features:
-Time Edit You can edit a jobs starting time in many ways, either by
directly entering the new time, or by the Time Edit buttons
"Quick Time Edit" allows you to for instance set
the start time to be when the last job was calculated to finish
"Full Time Edit" allows you to adjust the finish time of
the previous job and the start time of this job in one screen.
This is useful when you forget to stop the clock for a
job, and realise it has run too long and both the previous and
current jobs need to be corrected.
-Reports
There is a full searching and totalling feature. Time can be reported
in minutes, units, quarter hours, hours or days.
You can select by date ranges, or by client name.
-Timesheets
There are two comprehensive ways to view and edit previous stored time.
These are from the "Timesheet" button: Standard Edit and Diary Page
edit
-The time recording screen shows running totals of time elapsed and
chargeable for today, this month, and this year.
To Index
Graph
Number Minutes in a Work Day
This is for calculating the Bar Graph: the total length (100%) is the
number of minutes per working day, and the bar shows the progress of
the time spent since start of the day, time logged, and time charged as
a fraction of the work day.
This provides a nice summary of how your Time Recording is going for the
day.
This provides an instant summary of todays time recording.
The total length of the bar represents the length to the work day,
as set up in the System Options.
The Red/Yellow bar represents the total amount of time chargeable today
as a fraction of the working day.
The Grey/Blue bar represents the fraction of the day
logged so far. Once this bar is as long as the work day, then a complete
days work has been logged.
The employee will aim to:
- Have as high a proportion as possible of chargeable to
non-chargeable time.
- Have the logged time at least as long as a standard working day.
If it is shorter at the end of the day, then not all time has been
logged, or less than a days work has been completed.
When logging one job or matter, the total minutes logged for that job or
matter are also shown, blue is total minutes, red is chargeable
minutes.
To Index
Timesheet
To correct or complete previous entries, click the TimeSheet button.
Note you can do this while a job's clock is running, as seen here
Timesheet View
Diary View

For a simple quick list of timesheet entries that spans a date range, use
the second option.
For a visual look at the time data for a day in a diary format use the
third option - this is fun to use.
All these options are interchangeable, and if you edit time details in each
(notes etc) the screen to do is the same.
To find time and print reports or lists - choose the fourth option.
Simple TimeSheet Edit
- Recommended option
This takes you to a TimeSheet screen:
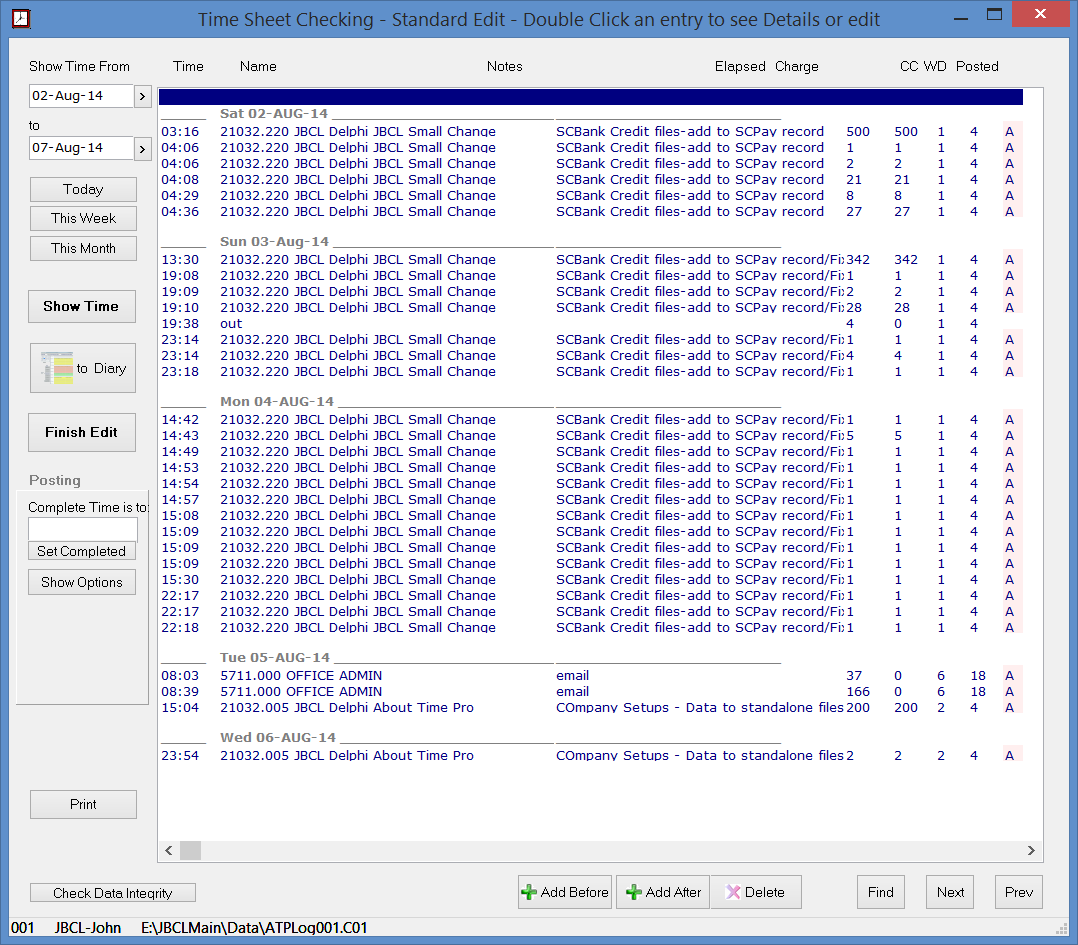
Fill in the date range you want and click "Show Time". (you can enter
dates as for example 29-apr-09 or 29.4.09 or use the arrow on the right or
the date to select dates with the mouse)
To edit one entry, double click on it, or press Enter on the one you want.
You will see the editing screen is almost the same as the original Time
Recording Clock screen.
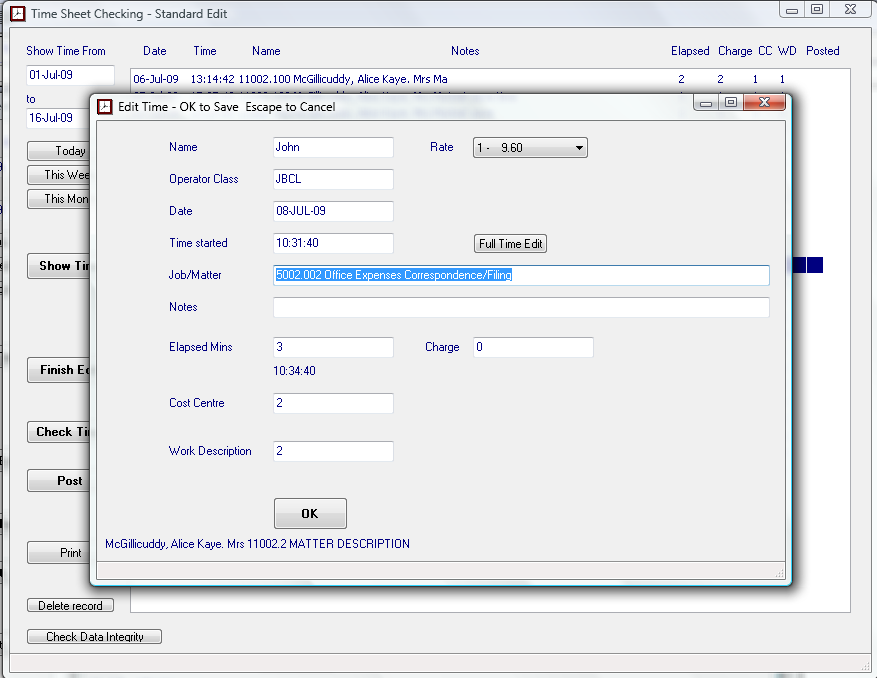
This editing screen has the same options for looking up a job by code or
name, special jobs such as out or tea, and also for finding previous jobs by
pressing the up arrow.
Cost Centres and Work Descriptions can also be entered by name
or code.
Click "Finish Edit" when you are done.
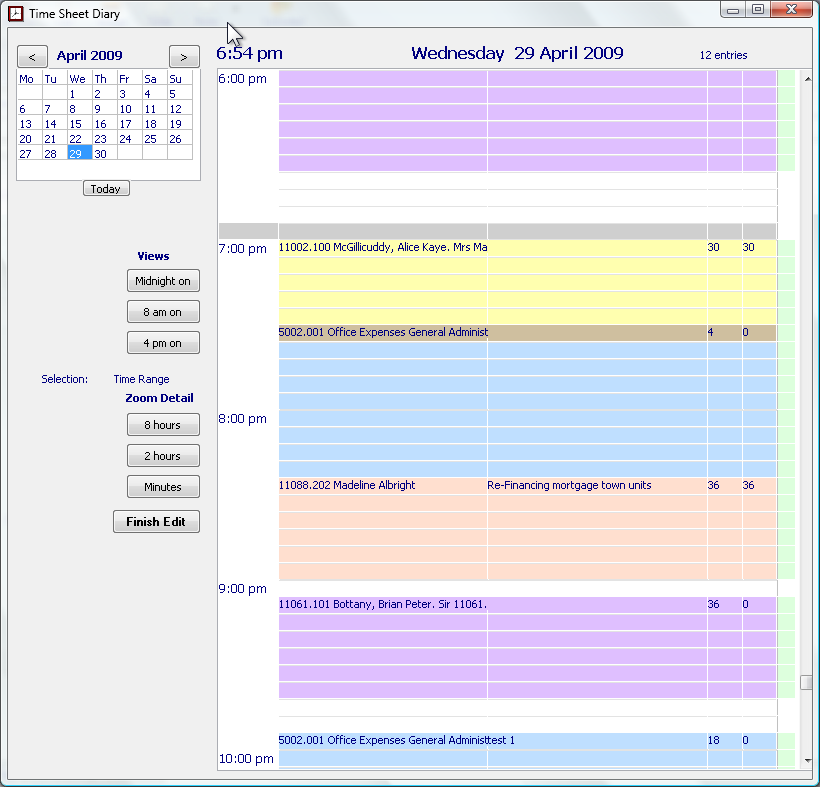
Diary TimeSheet
This is designed to make editing of timesheet data visual, easy and fun.
Note you can see one day at a time, and you can zoom in or out.
The zoom function is because if you view a whole day from 8am to 6pm
then some of the jobs may be so close together on the screen you cannot tell
them apart.
Here is a view of the same data as shown in the other timesheet view above
8 Hour view:

2 Hour view:
In both of these, each line is a 6 minute unit.
The third view is in single minutes - this is not needed often, but if
several jobs follow each other in the space of a few minutes, this is the
only way to see them.
Here each row is one minute.

Notes about the diary view:
The look:
- The colours of jobs are shades of blue for non-chargeable jobs, and
red/yellow/orange/green for chargeable ones.
- The job or matter code and name is shown for each, and the
description, and the number of elapsed and chargeable minutes.
- The colours on the right edge of the page is whether the entry is
complete - yellow is incomplete, green is complete, blue is posted.
- The current time the mouse is on is shown at the top left of the
diary.
- You can jump to different parts of the day using the "Views" buttons.
The default is 8am onwards.
- You can zoom in or out to see more or less detail using the zoom
buttons
- You can also zoom by clicking in the left (time) column - this cycles
through the 3 zoom levels.
- Only click in the time column to change the zoom view
- If you zoom using the time colum, the new zoom level will have the
same time where you clicked.
- Any rows where more than one timesheet entry starts (ie collisions)
are shown in brown
Selecting a time range
- The current row and any selected rows are shown in grey
- You can use the mouse to select - hold the left mouse button down
and move the mouse up or down the diary - not in the time column
(the left column)
- You can use the keyboard to select - hold the shift key down and press
the up or down arrow to select a range of rows
- The selected time range is shown at the top left of the diary.
- To finish selecting a range Release the left button (if using mouse)
or release the shift Key (if using arrows)
Adding a timesheet entry
- To add a new timesheet entry, select a range of times on a blank
(white) part of the day. This will insert a new timesheet entry.
- You have to select over more than one row to add a new entry. If
you want only 1 unit, then move to another row and back again to reduce
the selection to 1 row.
- After the entry is added, the edit details screen will automatically
come up so you can set the Job or Matter for it.
Altering the times of an existing entry
- drag the top or bottom of the time up or down.
- start selecting inside
the current time range near the top or bottom and move either up or down
as you wish
- (You dont't have to start at the actual top row - if you are closer
to the top it will move the top, if you are closer to the bottom it
will move the bottom)
- Jobs cannot overlap, so if you select a range that overlaps into
another one it will only alter the time to the edge of the other one.
- (If you want to move the start or finish times of a job into the
previous or next jobs times, then move the other job start or finish
times out of the way first)
- When times are altered this way, the jobs time is always in
whole units, (or whole minutes if you are in the zoom minutes
view).
Editing details of a time sheet entry.
- Anytime you can also double click anywhere in a timesheet entry
coloured row to edit the details of the job.
- This brings up the same edit details screen as for the Simple
TimeSheet entry above.
To Index
Advanced use of the Timesheet Manager:
In the JBCL Standalone system, the TimeSheet manager allows a central
adminstration person, eg in the accounts department to view, check and
complete if needed the time sheets for all employees.

To Index
Reports/Finding Information
- The time history is permanent and can be searched in many flexible
ways.
- The easiest way to find time history is to search for clients by name.
- Note - a convenient way to analyse jobs into sub-categories is to use
a keyword at the beginning of the Notes field. This can be
searched for within one client.
- Time can be reported on in minutes (default), or units, or decimal
quarter hours, or hours or days
- Time history can be selected by a date range
JBCL No-Nonsense Licence Agreement for general users
- This is commercial software of a new type
- This software is free to download and use - it is not copy protected
- You can get updates at any time freely to the latest version and get
new features at no cost
- You can freely move software and data to another computer.
- You can freely copy the software to new computers for new users
- Compatible with syncing data to a cloud such as Microsoft One Drive or
Google Drive, which means you can operate the same time recording on
different computers, e.g. a work PC and a home PC or a travelling
laptop. (you have to do a simple set up of your cloud provider details
before using this)
- You pay a small charge to use the software - typical charges are under
1 cent for recording a timesheet entry etc. Typical charges may be
around $2-3 per month.
- The software starts with a $10 credit balance, so you do not have to
pay anything until you have used up the credit and tried it out
- Until you have trialed it and you want to keep using it - it will not
cost you
- You pay for what you use after you have used it.
- Charges in the program are only applied to operations of some benefit
to the user.
- From time to time you top up your credit to keep the program working
fully - similar to recharging a phone card.
- Multi-Company system - i.e. you can run separate Time Recording setups
for several businesses.
- Charge rates are expected to decrease over time.
- Although you can freely copy the program and data files,
payments can only be applied to each distinct site.
- Your data remains yours - if you cease using the software or have run
out of credit, you can still run reports on information you have
entered.
- Usage charges are accumulated by another JBCL program : JBCL Small
Change Meter. You will see this program start automatically,
just leave it running in the background. You can use its
screen to check your running balance etc.
Privacy
- When you pay for a top-up JBCL sends some information from your system
to get charging details. The information has details of
types of operations done (entry using clock or diary or reports
etc). This information does not include any of your data
such as client details or notes.
- There is no advertising in this software, and no data is send from
JBCL to any advertising organisations.
Open Software
- This is open software of an innovative type - the core time recording
module is proprietary to JBCL (for now) but the data format is quite
simple and open and JBCL encourages other systems to integrate with it -
to import or export data.
- JBCL intends to add an interface with JIRA so that current jobs(tasks)
can be downloaded and recorded time can be uploaded to JIRA
- Time can also be recorded on a phone and uploaded to the JBCL About
Time Professional data
- Other interfaces like this to other systems are encouraged.
- 2020 update - With the Covid-19 pandemic disrupting work all around
the world, and a large number of people are having to work from home
this Time Recording system is convenient to use as it is stand-alone,
lightweight and very modest cost. Until the world starts to
come out of lock down JBCL is not intending to impose charges for use of
this software.
Innovative
- It caters for 4 different ways of entering time - via computer clock
recording the times, or a standard timesheet, or a diary page, or via a
phone. These are all interchangeable - everyone has their
favourite.
- High resolution - time is recorded to the millisecond, but can be
shown in minutes, units, quarter hours, or hours etc.
- A very large number of clients and a very number of jobs for each
client are possible (about 1844674407370960000)
- Elapsed and charged time are both always recorded, so time written off
or not charged can be easily seen
- Uses another JBCL program - JBCL Small Change - to mount up small
charges for using the program.
- This program can be used to charge other software as well.
- Small payments after some time of use can be made simply
Goal of this software
- For all those who have to record and account for our time for work, it
might as well be easy, streamlined and fun to do.